The Homecloud Digital Home Manager (www.homecloud.com) from Westell Technologies is cool enough that it might convince Apple fans it’s a better choice than a Time Capsule. It’s designed to create a personal computing “cloud” within a home or a small-business environment.
Overview
The Homecloud Digital Home Manager (DHM) is a wireless router, a network hub, and an application server, all rolled into one. It comes with an initial set of applications that lets you implement automated data backup and sharing of content across devices using the Mac OS X, iOS and Windows operating systems. (Confession: no Windows systems were included in our Homecloud test drive.)
We’re not convinced that the much-ballyhooed, Internet-based “cloud” is the ultimate solution as many folks believe. Sure, it offers a variety of benefits, including virtually unlimited storage (in theory at least), anywhere, anytime access (well, as long as you can get online) and easy sharing of content.
However, there are concerns about the sharing and syncing of personal data between different online services, as well as privacy and security of your data. Plus, what if the cloud service goes down?
Homecloud offers at least a partial solution to these concerns: a true home cloud environment. Just plug in a storage device and your content is automatically backed up and stored in one controlled location: your home network. Personalized cloud applications are run from one centralized location. Pictures, movies, songs and work files can be shared and synchronized between connected home devices. For us that works much better than a solution that only involves a cloud running on distant servers.
Setting up your personal cloud
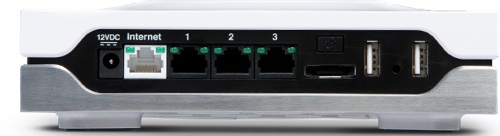
Creating your Homecloud environment is, if not easy, at least not difficult. You start with the Homecloud DHM, which serves as the central cloud application server for the home or office. Connect an external hard drive, and you’re off and running — or clouding, as the case may be. The DHM sports three USB ports, so it’s simple to connect and sync portable devices.
To install the DHM, attach the included Ethernet cord from the white Internet port on the back of the DHM to the Ethernet port on your broadband modem (cable, DSL etc). Plug in the power supply to the DHM. (The DHM comes ready to be used as a wireless router. If you want to connect the DHM to an existing router, check out the DHM Router Quick Start Guide from the support page on www.homecloud.com .)
To connect the DHM to the wired devices on your network, use one of the unused Ethernet ports on the back of the DHM. To connect to the DHM via wireless, you’ll see two Wi-Fi networks once the DHM has completed booting (which can take up to two minutes).
The Wi-Fi will be named “Homecloud_xxxx” and “Homecloud_xxxx_5G” (the xxxx are the last four digits of the Homecloud serial number). The wireless password is the DHM serial number on the bottom of the DHM.
Now install the software that comes on the Homecloud USB flash drive. Once your Homecloud desktop application has been installed, you’ll see a menu icon at the top of your screen. An alert tells you to register your device with the Homecloud DHM. Click the alert to go to the admin interface. The default log-in and password are “admin.” On the DEVICES tab, you’ll see a new device is waiting for approval to join the Homecloud network.
In order for My iOS, Backup & Share and Data Protection to work, you must connect one or more storage devices to your Homecloud DHM. The first storage device connected is dubbed the “Homecloud Drive”; this can be a USB Flash Drive, external USB hard drive, etc. The Homecloud Drive can connected an USB port on the back of the Homecloud DHM.
Once you plug in the drive, the Homecloud DHM will mount the drive and you’ll receive notification from the Homecloud menu bar icon that a new drive has been detected. Click the alert message to go to the Homecloud admin interface or click on the menu bar icon and choose “My Homecloud Configuration.”
On the STORAGE page you’ll see the new drive listed. Click “Add To Homecloud.” However, take note: the drive will be formatted so any data will be lost.
To add a Backup & Share drive, plug your drive into the front USB port and repeat this process, and click on “Add to Backup & Share.”
Unfortunately, the Homecloud doesn’t come with documentation. You can find it online at http://homecloud.com/support/documentation .
Performance
The Homecloud DHM hardware is relatively quick and efficient. It uses a dual processor design (a dual core Marvell 78200, ARM-based processor) with one processor dedicated to the router and the second processor dedicated to running applications. Internal storage is an 1GB SSD for the Homecloud application platform; there’s 512MB of internal RAM.
The Homecloud DHM has decent throughput at the 5GHz band, though less than average throughout at the 2.4Ghz band. Alas, mixed mode is the mode most home users will probably use — and it’s the slowest.
The initial release of Homecloud includes built-in applications that allow users to back-up, protect, synchronize and share their data. You can find a list of the apps at http://macte.ch/EVcIO .
Overall, there’s a lot to like about Homecloud. It’s real power is the applications and the integration to the desktop. Being able to select a folder on your Mac and adding it to the Backup & Share or Data Protection Services is something no one else is doing today.
Homecloud units may be purchased only via the Homecloud website at a special introductory price of US$180 per unit.
Rating: 8 out of 10
