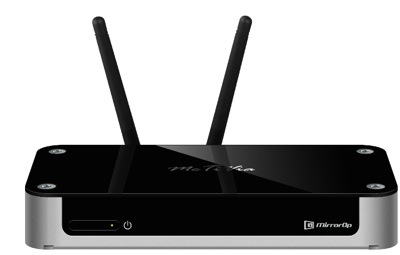
The McTiVia (http://www.awindinc.com/mctivia/), unveiled at January’s Macworld Expo, sounds like a certain health food promoted on TV by Jamie Lee Curtis. But it’s not.
The McTiVia is an US$199 device that lets you show all the content of your Mac — as well as Windows computers, if you care — on your TV wirelessly. You can purportedly control up to eight computers with your mouse and/or keyboard (I’ve only test driven it with one). You can share any content from your computers with your friends and family in your living room.
The McTiVia can also act as a wireless access point for your home network, and has a USB port for connecting a mouse and keyboard to control your Mac (sorry, no Bluetooth support). You can use it to, for example, use your big screen TV to play Mac games, surf the web from your couch, access TV shows/movies online, and more. What’s more, you can also use your iPhone as a mouse/keyboard to control your Mac.
Hook-up isn’t as simple as it could be. Connect the HDMI output on the McTiVia to your TV and turn on the television. (You’ll have to bring extra for an HDMI cable, as the McTiVia doesn’t come with one). Connect the power adapter to your McTiVia and plug it into an outlet (several outlet “tips” are provided). Turn on the McTiVia box.
There are four ways to connect the box to your home network. The McTiVia is touted for its wireless capabilities, but if you want the best performance, use an Ethernet connection. If an Ethernet cable isn’t feasible, you can use a pair of power-line modems to set up a wired connection from your home network to the McTiVia. The provides good performance, but I doubt many Mac users will go this route.
Most folks will probably choose the “reasonable” performance offered by the partly wireless set-up. You can connect the McTiVia via cables to your home AP. The more adventurous, and/or technically minded, can go purely wireless for basic performance. However, this set-up is more complicated and vulnerable to any interference in the Wi-Fi signal.
After you’ve completed your set-up of choice, insert the CD-ROM that came with the MacTiVia and install the software. In your Applications folder, find and open up the new MirrorOp Sender app.
Next locate your Wi-Fi access point and choose McTiVia (the default SSID is McTivia) and click the Connect button. Hopefully, you’ll connect to your McTivia server. If only one server is found, the software will automatically connect to it.
The software will temporarily adjust your computer resolution for the best projection result, and then project your Mac’s screen to your TV.
To finish the projection, click the Stop button on McTiVia MirrorOps Sender. The screen resolution will be restored to its original res. To start projecting again, click the Play button in the MirrorOps Sender app.
At least that’s the way it’s supposed to work. My experience wasn’t as seamless. I had to fiddle with the settings in the MirrorOps app. What worked best for me was setting the Projection quality to Normal. The app recommends Normal or Small computer screen resolution, saying that Large wants an Ethernet connection. However, I didn’t use the Ethernet option, and Large worked wonderfully for me. But your mileage may vary.
You should also note that you’ll have to use the McTiVia as a wireless router if you want to do things like broadcasting Hulu shows from your Mac to TV. That takes a bit of work, but you can find the steps at the McTiVia web site.
The box allows you view anything that you would normally view on your Mac on your TV — all with full audio support (well, two channel audio). There’s a slight “lag” in data from the Mac to TV, but both the video and audio is in sync on the TV.
McTiVia works with 802.11n WiFi signals and can purportedly can go up to 90 feet, though this depends on your WiFi environment. I didn’t try it past 30 feet, and it worked fine at that range.
If you’re going to be connecting to the Internet a lot when using McTivia, make plans to use Ethernet connectivity. Plug in an Ethernet cable to the Ethernet connector on the back of McTiVia then connect McTiVia by WiFi or se WiFi AP-Client Configuration function to set. You can refer the manual about this.
Also note that McTiVia only mirrors the main display now (the screen with Apple logo on the menu). However, extended desktop support is supposedly in the works.
The McTiVia doesn’t have some glitches. However, I know lots of folks who have wanted to be able to wirelessly connect their Mac to their HDTV and, despite some less-than-seamless set-up procedures, it does a good job of wirelessly mirroring content from your computer to your HDTV.
Rating: 6.5 out of 10
— Dennis Sellers